 Pin this
 I discovered black currant marshmallows quite by accident when my neighbor brought over a jar of homemade black currant jam one autumn afternoon. She mentioned offhandedly that she'd always wanted to make marshmallows with it, and something about that casual wish stuck with me. A few weeks later, standing in my kitchen on a quiet Sunday morning with the jam sitting on my counter, I decided to actually attempt it. The result wasn't perfect on the first try, but that lavender-pink cloud of fruit-infused sweetness felt like uncovering something special, something that tasted like both nostalgia and discovery at the same time.
I'll never forget the first time I made a batch for my book club gathering on a rainy February evening. Everyone arrived skeptical, honestly—marshmallows at a book club?—but within minutes, the kitchen filled with people holding these delicate pink squares, genuinely amazed. Someone asked for the recipe right there, and another person mentioned they hadn't had homemade marshmallows since childhood. That night reminded me that food doesn't have to be complicated to feel memorable.
Ingredients
- Blackcurrant purée: The star ingredient that gives these their beautiful color and sophisticated tart edge—use fresh or frozen berries blended and strained, or swap in blackberry, raspberry, or cherry purée if that's what you have on hand.
- Powdered unflavored gelatin: Three packets might seem like a lot, but this is what creates that signature cloud-like texture and stability that regular marshmallows rely on.
- Granulated sugar: One and a half cups goes into the syrup that gets whipped with the gelatin—this is crucial for structure and sweetness balance.
- Light corn syrup: This prevents crystallization and keeps your marshmallows silky instead of grainy, a lesson I learned the hard way on attempt number two.
- Confectioners sugar and cornstarch mixture: For dusting both the pan and finished marshmallows—this prevents sticking far better than either ingredient alone.
- Vanilla extract and salt: These small additions brighten the black currant flavor and prevent the sweetness from feeling one-dimensional.
Tired of Takeout? 🥡
Get 10 meals you can make faster than delivery arrives. Seriously.
One email. No spam. Unsubscribe anytime.
Instructions
- Prepare your stage:
- Line your 8x8 inch baking pan with parchment paper, then dust it generously with the confectioners sugar and cornstarch mixture—this step prevents heartbreak later when your marshmallows stick stubbornly to the pan. Take a moment to make sure the corners are well covered.
- Cook the black currant base:
- In a small saucepan, combine the black currant purée with water and sugar, then let it simmer gently for about 4 to 5 minutes until it thickens slightly and deepens in color. You're not making jam here, just concentrating and stabilizing the fruit flavor—let it cool completely before you use it.
- Bloom the gelatin:
- Sprinkle your gelatin over the cold water in your stand mixer bowl and let it sit undisturbed for 10 minutes—this hydration step is what allows it to dissolve smoothly when you add the hot syrup. Resist the urge to stir or hurry this along.
- Create the sugar syrup:
- In a medium saucepan, combine sugar, corn syrup, and water, then heat over medium-high while stirring until every granule dissolves. Once you insert your candy thermometer and stop stirring, watch carefully until the mixture reaches exactly 240°F—this temperature is the sweet spot between soft and stable.
- Whip the magic:
- With your mixer running on low speed, pour the hot syrup very carefully into the bloomed gelatin, then crank the speed to high and whip for 6 to 8 minutes until the mixture tripled in volume, turned glossy, and became almost cloud-like. This is the moment when you realize why people get excited about making marshmallows at home.
- Add the fruit and flavor:
- Pour in the salt, vanilla, and cooled black currant purée, then whip for just another 1 to 2 minutes until everything is evenly distributed and the whole mixture turns that beautiful soft lavender color. Don't overmix past this point, or you risk deflating all that lovely air you just incorporated.
- Set and rest:
- Immediately pour the fluffy mixture into your prepared pan, smooth the top with a spatula, then dust generously with more of the confectioners sugar mixture. Leave it uncovered at room temperature for at least 4 hours, or ideally overnight, until it's completely set and firm to the touch.
- Release and cut:
- Turn the entire slab onto a cutting board, peel away the parchment, dust all the exposed sides with your sugar-cornstarch mixture, then cut into neat squares with a sharp knife that you've also dusted with the mixture. The dusting on the knife prevents sticking and makes each cut clean.
 Pin this
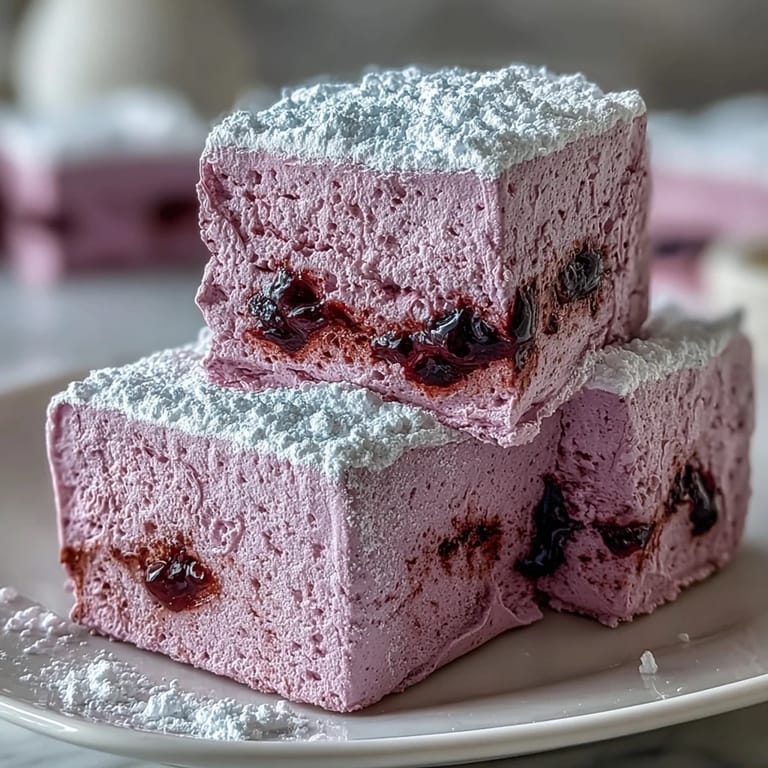
 There's a particular joy in pulling fresh homemade marshmallows from the pan, dusting them off, and taking that first bite—that moment when you realize you've created something delicate and perfect with your own hands. It's the kind of small victory that makes you want to fill a box with them and hand them to everyone you know.
The Art of Getting the Color Right
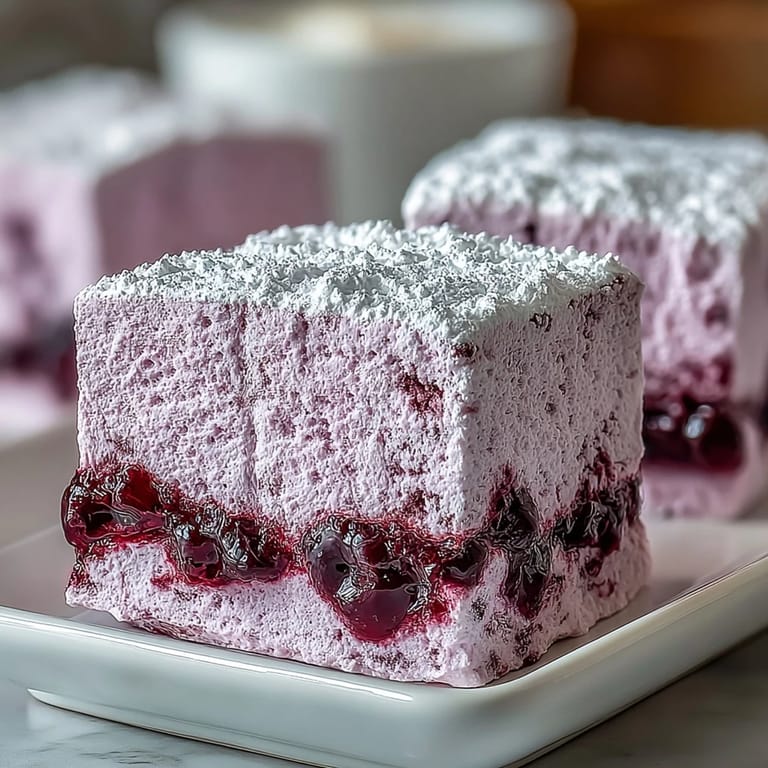
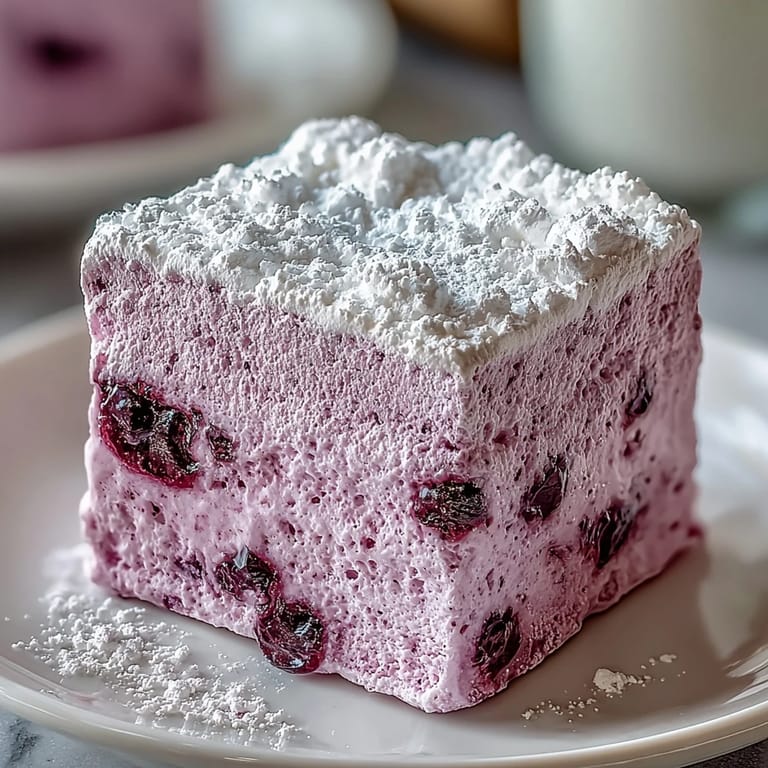
The lavender-pink hue that emerges when you fold the black currant purée into your whipped marshmallow mixture is honestly one of the most satisfying visual moments in this recipe. The first time I made these, I watched the color transform from pure white to this soft, dusty rose, and I understood why people get genuinely excited about homemade sweets. The color comes directly from how much black currant you use and the natural pigments in the berries themselves—frozen berries actually give you a more vibrant result than some fresh ones because the freezing process intensifies the color compounds.
Flavor Variations Worth Trying
While black currant is stunning on its own, I've experimented with raspberry, blackberry, and cherry purées, and each one brings its own personality to these marshmallows. Raspberry makes them slightly more delicate in flavor, while blackberry creates an earthier sweetness that pairs beautifully with dark chocolate. Cherry adds an almost vintage candy shop quality that my kids absolutely loved. You can also swirl in a little extra purée just before the setting time to create ribbons of deeper flavor throughout.
Storage, Serving, and Beyond
These marshmallows live happily in an airtight container for up to a week, though honestly they rarely last that long in my house. They're perfect for hot cocoa on a winter afternoon, nestled on top while the heat slightly softens them, or paired with a thin slice of dark chocolate for an afternoon treat. You can also crumble them into homemade granola or use them as a component in s'mores if you're feeling adventurous.
- Stack them in a jar with parchment between the layers to prevent sticking and create a gift-ready presentation.
- If they start to dry out slightly after a few days, they actually become better for dunking in warm beverages.
- Make extra batches in different flavors and keep them in your freezer for up to a month if you need to plan ahead.
 Pin this
 Making black currant marshmallows taught me that sometimes the most worthwhile treats are the ones that require a little patience and a candy thermometer, but reward you with something genuinely magical. Every time I make a batch, I think of that autumn afternoon when my neighbor casually mentioned her dream, and I'm grateful I actually turned it into something real.
Recipe Questions
- → How long do black currant marshmallows take to set?
Allow the marshmallows to set uncovered at room temperature for at least 4 hours until fully firm. For best results, let them set overnight before cutting into clean, neat squares.
- → Can I use frozen blackcurrants instead of fresh?
Absolutely. Frozen blackcurrants work perfectly for the purée. Simply thaw them completely, blend until smooth, and strain through a fine-mesh sieve to remove seeds before using in the preparation.
- → What temperature should the sugar syrup reach?
The sugar syrup must reach exactly 240°F (115°C) on a candy thermometer. This temperature is crucial for achieving the proper marshmallow texture—too low and they won't set correctly, too high and they become tough.
- → Can I substitute other fruits for blackcurrants?
Yes, you can replace blackcurrant purée with equal amounts of blackberry, raspberry, or cherry purée. Each fruit will create a different color and flavor profile while maintaining the same fluffy, pillowy texture.
- → Do I need a stand mixer to make these?
A stand mixer with whisk attachment is highly recommended because the mixture needs 6–8 minutes of high-speed whipping to triple in volume. A hand mixer may work, but you'll need significant arm strength and patience.
- → How should I store the finished marshmallows?
Store your marshmallows in an airtight container at room temperature for up to 1 week. Keep them dusted with the sugar-cornstarch mixture to prevent sticking, and avoid refrigeration as it can make them too firm.